Welcome !
Our Satisfaction.AI platform integrates our AI and Natural Language Understanding technologies which helps you manage your customer relationship through xBot agents that are :
- Intelligent
- cross-channel
- and multi-targets
We are going to see here, step by step how to set up your first xBot on our portal my.satisfaction.AI.
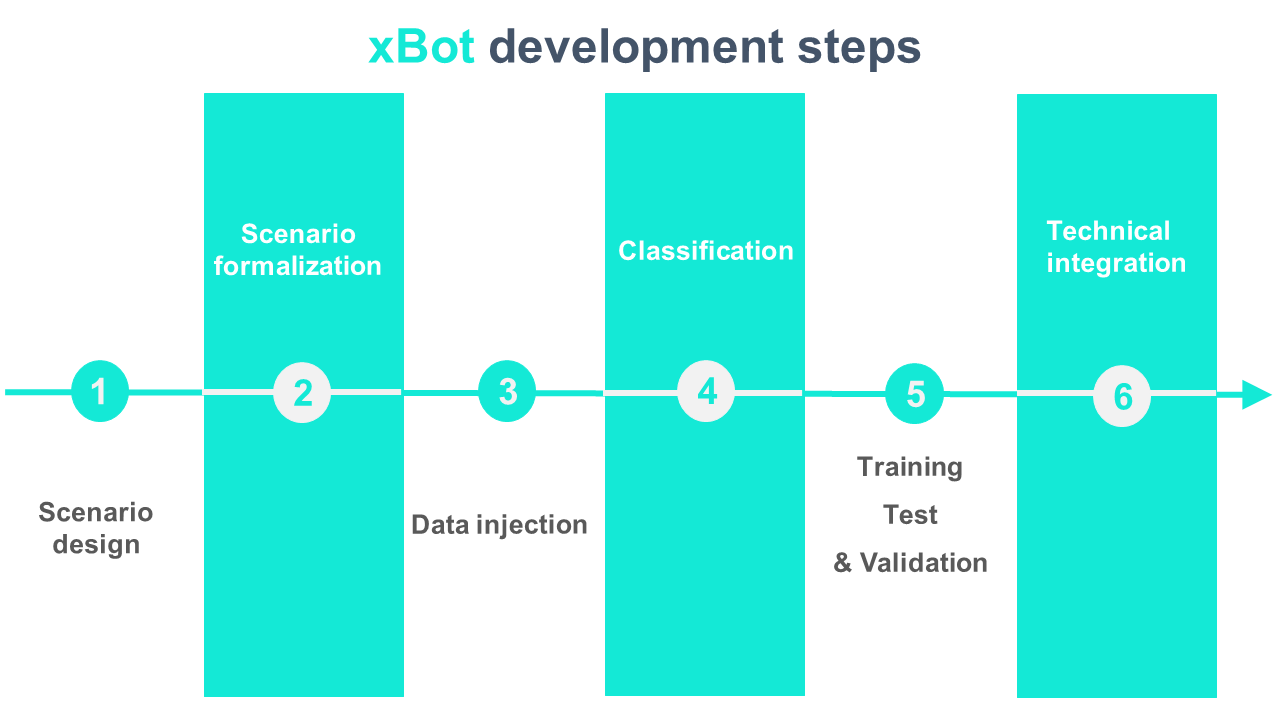
1 - Create conversational scenarios
Creating a xBot capable of having a conversation is like putting yourself in the shoes of a screenwriter of movies. You have to design the best scenario to respond to your customers, serve them and retain them.
Before starting to set up your xBot on the portal my.satisfaction.AI, you need to do a little preparatory work to gather your users’ needs and knowledge to teach your xBot.
You must first identify the intents of the end users of your xBot when they come into contact with it.
An intent represents what your users want to know or do when they interact with your xBot.
In other words = 1 Intent corresponds to 1 customer need
a) - Identify Intents
An intent represents a client need and is associated to a scenario.
To get started in this stage, we have identified the following actions :
-
Analyze the needs of the end users (it could be your customers or employees) of your xBot by working with people who are on a daily basis with them.
-
Identify the questions your users ask and the problems they encounter through existing databases: emails, FAQs, or any other customer data source.
-
Determine exactly the perimeter of your xBot. It should not answer all the questions. To start, it is recommended to focus on a limited area.
-
Group these questions by need. Each need will represent what is called an intent.
-
Different questions may correspond to the same intent. For example, the question “is the weather nice today?” and “should I take my umbrella?” are related to the same intent, the “meteo” intent.
-
Examples of usual intents:
- Opening hours and location of offices
- Questions of all types that you could find in your FAQs
- Scope of insurance coverage
- To go further:
You can find in our documentation other tips to build your scenarios in our guide to educate your xBot .
b) - Organize the scenarios
Once the first batch of intents has been identified, the next step is to streamline the resulting conversation flows and imagine the answers you want to give your users. For this you can create conversation trees and you can also :
-
List all actions your xBot should offer to your customers.
-
Draw on a sheet of paper the first branches of your discussion tree. This makes it easy to see all the scenarios.
-
For each level of conversation, identify and list all the information and business knowledge you need to meet the user’s intent.
-
With this information, draw the sub-scenarios (any sub-questions / answers).
-
Identify which APIs you need. Your xBot’s responses can sometimes require a connection to data sources such as your information system (databases, business applications, etc.) to perform the tasks required by your customers’ intents, such as for example planning a callback or providing updated information about a transaction / contract / delivery status etc … . It is important to identify the necessary APIs.
- To go further:
You can find in our documentation other tips to organize your scenarios in our guide to write dialogue scenarios .
Once this step has been completed, you have described the dialogue tree and all of the important information and description of the actions of your xBot.
The next step is to validate the availability of the information and write all answers your xBot will display.
c) - Write the answers of your xBot
-
Take care to define the tone with which your xBot will address the end users: it will need a personality to which your users will relate an empathic relationship, and a tone consistent with your brand. This step of defining the xBot’s personality is fundamental in human-machine interaction. Think also to give a name to your xBot!
-
Basic rule in the construction of your xBot: minimize the length of your answers! Chat is a medium that does not support long texts, it must provide synthetic answers.
-
To do this, you can use interactive media elements such as hyperlinks: a user prefer to click a link to a FAQ containing the complete answer, rather than reading the same response concatenated in a small dialog box. The format and the ton of a response from the FAQ is not suitable.
-
You can also include in the chatbox Button dialog, carousels, GIFs, images, embedded YouTube videos, bullets, tables, emoji … you can be creative!
- To go further:
You can find in our documentation other tips to write the answers of your xBot in our guide for to write dialogue scenarios .
If you are several to write dialogues scenarios, then you can use this template which should facilitates the collaboration between all the stakeholders.
At the end of this step, the scripts of your scenarios are set, they define the skills and knowledge of your xBot. It is time to move on the portal my.satisfaction.AI !
2 - Formalize the scenarios in the my.satisfaction.AI portal
Once your conversational scenarios are well documented, you can start working on our my.satisfaction.AI portal and add the Intents you have identified. This can be done via the following 2 steps:
a) - State the Intents in Athena ©
- By using the language Athena © to describe the scenarios, you can make these scenarios understandable by a computer. You can write theses intents in the « Knowledge & Skills » page . Here is an example of a scenario described in Athena © :
?! hi
? HELLO
? GOOD MORNING
	- Hi, I am your conversation agent. Do you want a coffee ?
	? YES
	- Ok! I have just ordered one for you and it will be ready very soon.
	? NO
	- You are right, it is not so good for your health :)
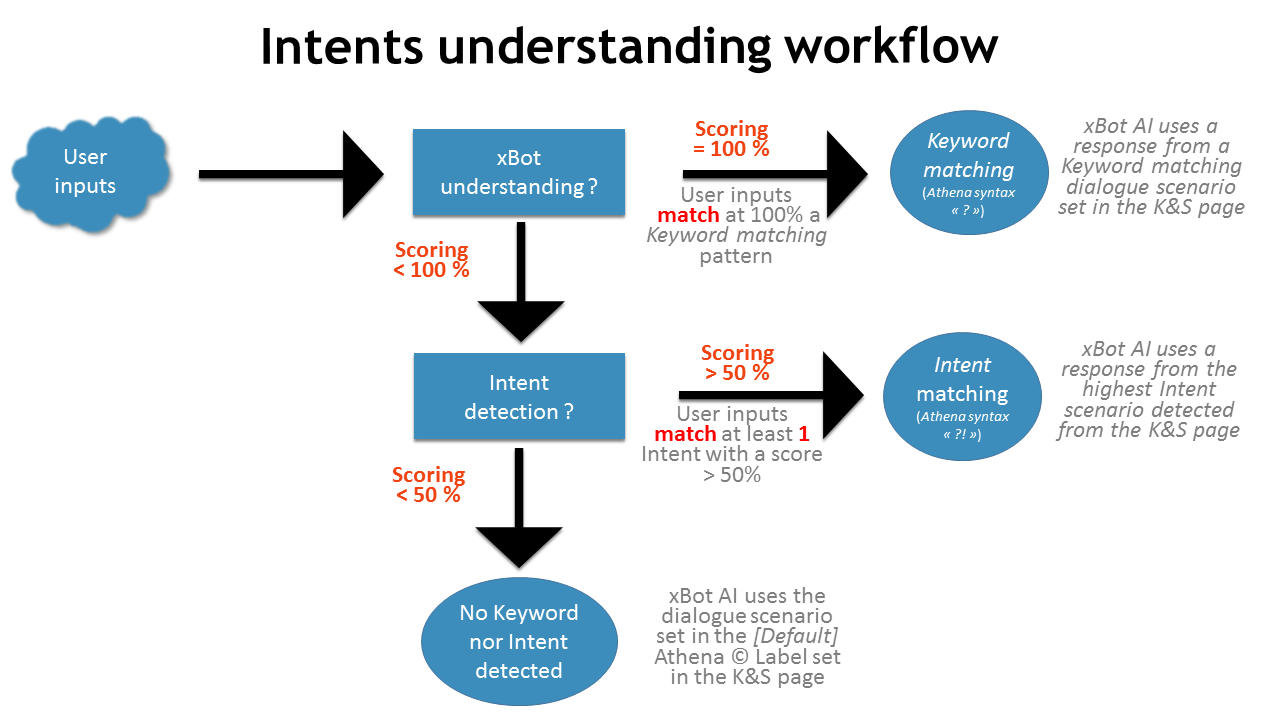
For each intent expressed by your users, you have the possibility to choose how your xBot will understanding it:
- by Keyword matching

- by intent detection based on our artificial intelligence engine.
- To go further: You can find more information in :
-
our guide on the features of the « Knowledge & Skills » page allowing to write your scenarios in Athena © and to choose how the intents will be understood by your xBot.
-
the documentation Athena ©, where you can access more detailed information about the syntax of this language, as well as multiple examples of dialogues written in Athena ©.
Once your answers are described in the “Knowledge & Skills” page, you have to create a gateway between the user’s intents and the scenarios you have just described in Athena ©.
To perform this, you have to declare the intent of the “Knowledge & Skills” page as seen above AND create also the intents on the portal’s “Intents” page.
b) **- Creating Intents to welcome the User sentences **
Let remember that an intent corresponds to the user need, expressed by the latter in one sentence.
At this point, you have identified the intents your end users may have by contacting your xBot, and you have written the response scenarios in Athena ©. It is now time for you to create these intents on the “Intents” page.
- To go further: Concerning the creation of intents in the page “Intents”, you can find in our documentation:
-
additional information to create intents in the « Intents » page.
-
a guide on the interface of the Intents page.
3 - Feed your xBot in conversational data
Your xBot now needs conversational data to move on to the learning phase. The creation of a learning corpus can be created from existing or non-existent sentences and conversation data.
These sentences will then be used during the classification phase, they will be associated with intent and will represent the different wording used by the users to express this intent.
They will feed the artificial intelligence model of your xBot.
- Data Injection Methods
To inject data into the artificial intelligence model of your xBot, there are several options available:
1) You can simply type text in the my.satisfaction.AI
2) If you are using the Chrome browser, you can perform a voice dictation on the same portal dialogue
3) If your xBot is a voice xBot, a phone number will be associated with it so that you can input voice data
4) Just after the creation of Intents (see step above), standard sentences and client phrases can also be injected directly from the “Intents” page. By doing so, the sentences in question here will be directly classified into the good intent.
NB: All the sentences that you will write during your conversations with the xBot via options 1, 2 and 3 above will be saved and visible in the portal’s “Pending” page where they will then be classified (Our next step!).
- To go further:In the following pages of the documentation, you can find additional information about the features of the « Intents » page.
4 - Classify sentences
Once new sentences are added in the portal, you have to sort them into the correct intents. To do this, the “Pending” page of the portal my.satisfaction.AI allows you to classify your sentences.
All dialogue sessions add new sentences that need to be classified in this “Pending” page.
As previously seen, you can also classify new sentences directly in the “Intents” page.
When classifying a sentence, you have four choices:
a) - To associate the sentence with an Intent
You will perform this action during the training phase of your xBot so that it learns that the sentence to be classified (and similar phrases) are linked to a particular intent and therefore to the corresponding dialogue scenario.
b) - Archive the sentence
The archived phrase will be ignored in the xBot training phase (this means it will not be included in the AI model calculation) so that it will no longer appear in the « Pending » page. Archived sentences are typically phrases that correspond to intentions that are currently outside of the defined perimeter of your xBot. You can keep these sentences in an archived status for example for future new intentions.
c) - Flag the sentence as a Test set sentences
A test set sentence is a sentence that will not be taken into account in the calculation of the AI model during the xBot training phase but will be used to verify to which intent this sentence has been associated by your xBot. These test sentences allow you to benchmark the performance of your xBot after each training session.
d) - To delete the sentence
You can decide to delete a sentence so that it is not taken into account in the AI model calculation. It can then reappear again as a sentence to classify on the « Pending » page if it is reinjected in the portal and/or the chatbox.
NB: In order for your xBot to work to the maximum of its performance and recognition capabilities, it is important for each Intent to have sentences that are varied and different in terms of grammar, number of words.
- To go further: you can find in our documentation :
-
a description of the features to classify your users sentences,
-
our guide to classify sentences in Intents.
5 - Train and test your xBot
a) - Train your xBot
Once your sentences are classified, you are ready to train your xBot, i. e. calculate and calibrate the parameters of your xBot’s artificial intelligence model.
Go to the my.satisfaction.AI portal and click on the button on the top right « Training ».
Our Artificial Intelligence servers will then establish the AI model that will be used for the understanding of your xBot.
This may take few seconds. You then have access to the results of the model, as well as the results of tests (based on the tests sentences) that will allow you to verify and benchmark how good is the understanding of your xBot.
- To go further: You can find a guide on the Training page interface .
b) - Test via the my.satisfaction.AI portal
To test your xBot after a classification session, we recommend that you set at least 1 sentence out of 5 in your test sample.
It is not necessary that your test sentences are far apart in the turn of your classified phrases. Your test sentences can be similar to your classified sentences.
Your test sentences sample allows you to check and benchmark the performance of your xBot and see if the AI model of your xBot associate these test sentences to the right intent.
To see by intent the matching level with your test sentences, go to the «Training» page. By clicking on the ID of the training session and then on the “Test” tab, you will find (from left to right):
- the test sentence,
- the intent with which you associated this test sentence,
- the intent actually detected by the IA model of your xBot.
You will see if the detected intent is correct and can assess the classification and quality of the related sentences.
- To go further: You can find a guide on the Training page interface .
c) - Validation via your chatbox
The validation of your xBot’s skills can then be done by the experts of your field. This can be done via a “botathon” session, i.e. an intensive conversation session between your business experts and your xBot in order to validate the detection of Intents and the quality of its responses.
For this step, we can put in place a user testing interface replicating the final interface which will be in production.
6 - Implement your xBot
a) - Integration to your Information System
If you have information that are available via APIs, we can make API REST calls to integrate customized information to the xBot’s responses.
We can provide you an access to our APIs to optimise the integration with your Information System.
- To go further: For more information please contact our Customer Success team, they will be happy to assist you!
b) - Choice of the connector
The xBot that has been educated and trained to recognize and respond to your users’ requests can also express itself in the chatbox you may already have in place.
To integrate the xBot into a chatbox that is supported for example by Slack, Facebook Messenger, Chatra, Olark, Twilo, Instaply, Diabolocom, Twitter, WhatsApp, Skype, etc… you must use a connector that will link our AI servers and your chat interface.
- To go further: You can find in our documentation additional information on the connectors in the page Settings and also in the release in production of your xBot.
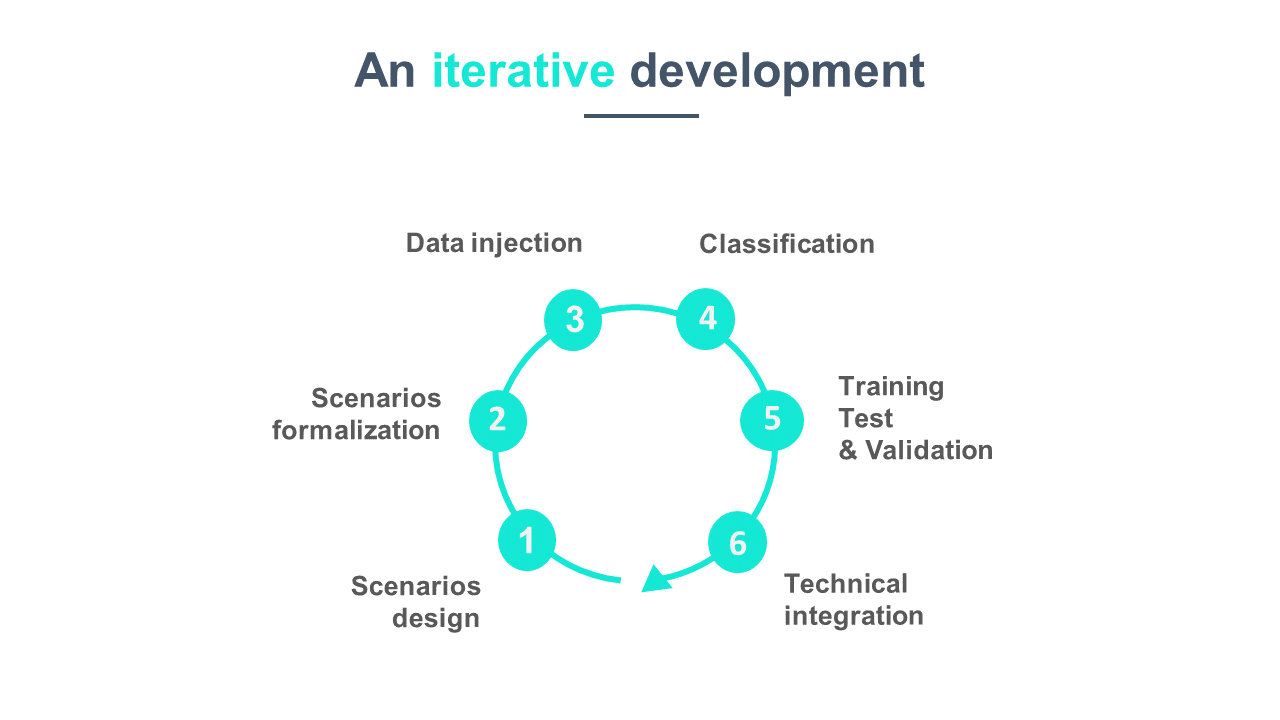
Improve your xBot
The 6 steps described above allow you to create your first xBot that should satisfy a set of defined end users’ requests.
With time and new data collected from transcripts and our reporting pages, you will be able to identify how to improve the scenarios already in place and how to extend the perimeter of answers / actions of your xBot.
Documented/reviewed 06/11/2017 7:12:55 AM