Interface - Knowledge & Skills
This page allows you to create and administrate (using the Athena © conversation language) the conversation scenarios which will be used by your xBot to understand and answer users’ requests.
A - The Athena © conversation language
The Athena © conversation language is a high level scripting language that facilitates the description of dialogue scenarios and the screenwriting of the conversational intelligence of your xBot.
This easy-to-use language offers the possibility to:
-
Create conversations in an almost natural language (almost the same level of writing as for writing articles)
-
Establish escalation scenarios to a human agent at your contact center
-
Manage the individual context of the user in the conversation scenarios (taking into account context and history of the user in the conversation)
-
Automate management of disambiguation
-
Integrate external information via the use of APIs from your information system (CRM, ERP, etc …) or other external web services
In the dialogue editor of the Knowledge & Skills page, you can outline (with the syntax “?!” in the Athena © conversation language) the scenarios of responses for the Intentions (i.e what your users want to know or do when they interact with your xBot). These Intentions correspond to the different entry points for the different scenarios specified in the knowledge domain.
During the Training stage of your xBot, we will once again explore the Intentions and the classification of the sentences that will “trigger” the response scenarios learned by your xBot.
B - Dialog Scenario Editor
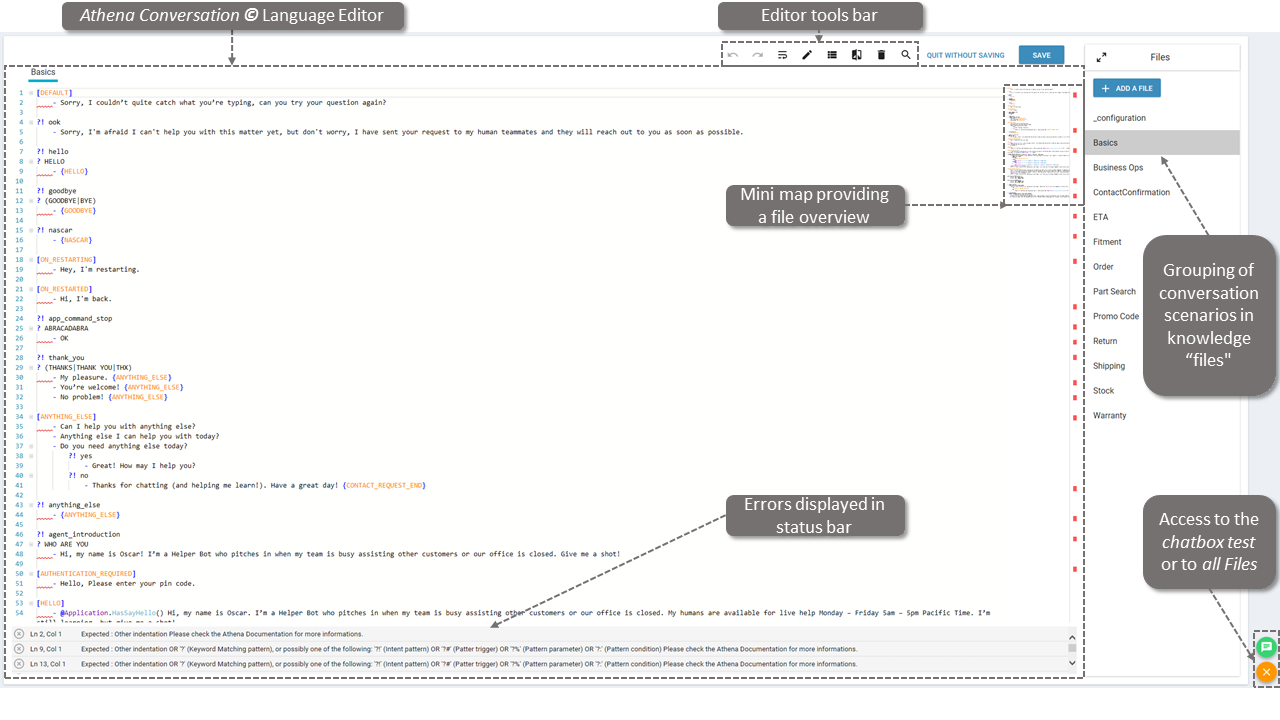
The Athena editor is the interface where you can write conversational and intelligence scenarios for your xBot.
1 - Files (Knowledge & Skills)
All your files are displayed by default when opening the Knowledge & Skills page. Clicking on the  icon at the bottom right corner of the interface helps you display only the selected file while clicking on
  gets you back to all files view.
NB: These files are not linked to the “Categories” that can be set in the “Intents” page.
2 - Editor tools bar

Redo/Undo: 
To make your life easier, you have two icons allowing you to undo or redo your last typing actions while editing a file. These functions are available only in editing mode.
Wrap mode: 
Word wrapping is a feature that breaks a section of text into lines to fit in the available width of a display area allowing the text to be read from top to bottom without any horizontal scrolling.
Edit file name: 
You can edit the name of the file or delete it in one click.
Command palette: 
This button shows a list of the many available commands in the editor including keyboard shortcuts for the most common operations.
Themes (Dark/light mode): 
The Dark mode is displayed by default. You can use this button to switch between the Light and Dark mode based on your preference.
Delete: 
You can delete the current file by clicking on this icon. To stay on the safe side, there is a confirmation message before executing the delete request as follows:

Search: 
A click on the Search Icon will display this SearchBox as shown below where you can type a word and/or a set of words to search for in the file displayed on the screen:

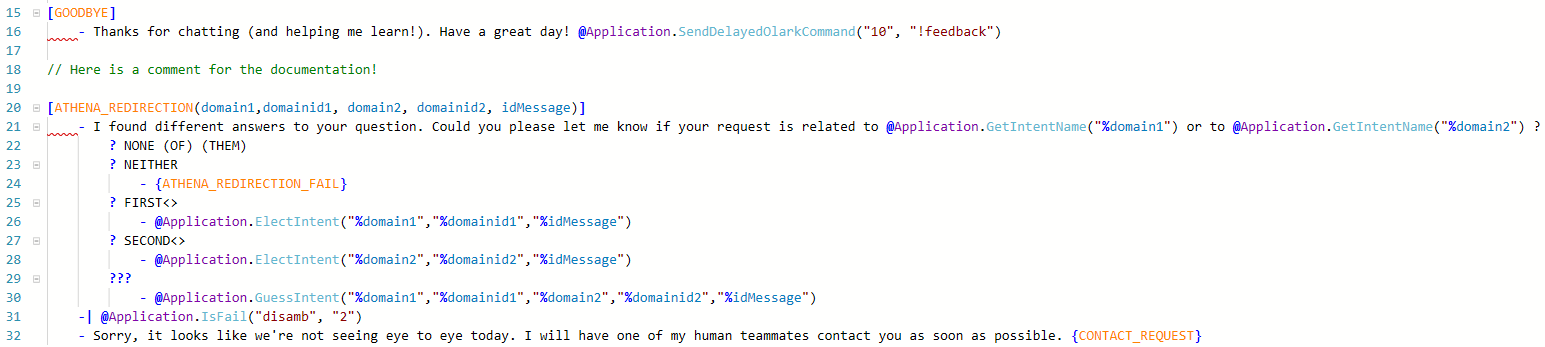
3 - Syntax colorization
The text is displayed in different colors in the Editor mode. Each color corresponds to a category of Athena terms. Depending on the dark/light mode used, the colors have different meanings. Here is the Syntax colorization definition:
-
When the Light Theme is selected :
- Green = comment,
- Orange = labelName,
- Purple = addinName,
- Light Azur = addinMethod,
- Red = expansion-factor,
- Brown/bordeaux = string & codeBlock,
- Medium Azur = variable,
- Black with underline fontStyle = url,
- Dark blue = elements of syntax,
- Black = Everything else,
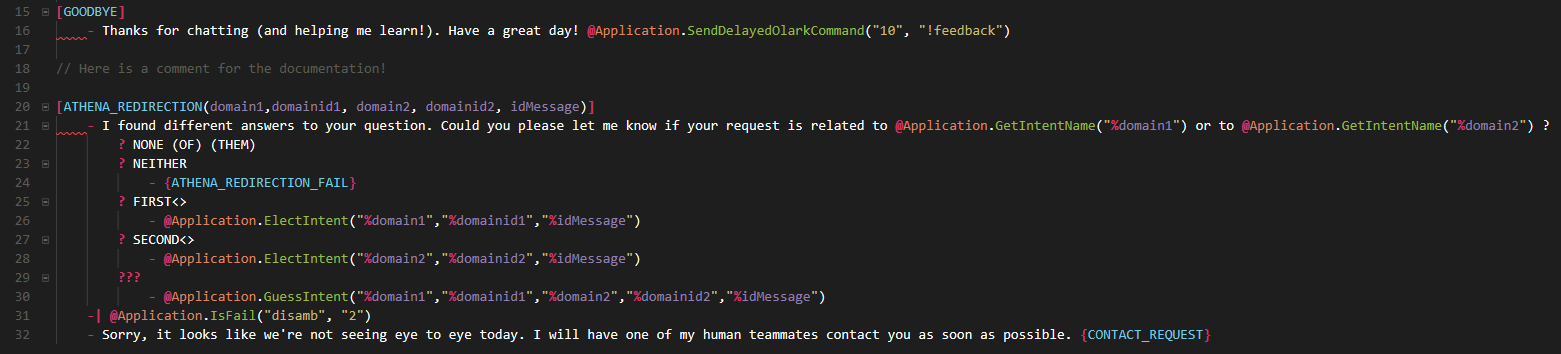
Here is an illustration:
-
When the Dark Theme is selected :
- Grey = comment,
- Light blue = labelName,
- Orange = addinName,
- Green = addinMethod,
- Red = expansion-factor,
- Yellow =_ string & codeBlock_,
- Purple = variable,
- White with underline fontStyle = url,
- Pink = elements of syntax,
- White = Everything else,
Here is an illustration:
4 - Scenario Editor
Editor mode:
If you want to update a file, you need to click on the  button. Once you are in this mode, no one else can edit the same file at the same time because the file is locked until you release it.
If someone else is already editing the file, you will see the avatar of the person on the top right corner of the Edit button:
![]()
The file will automatically unlock if your computer is disconnected, shut down or crashed (blue/black screen).
Save:
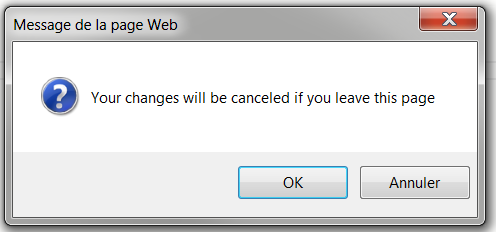
If you leave the editor to visit another page on the portal, close the browser or the browser tab without saving, a browser pop up will be displayed:
You can decide to quit and lose your work or save by clicking on the  button here available on the right side of the toolbar:
NB: If the session times out and you click on the button, your editions are saved, no need to login again to save your work.
Mini map:
The Minimap (outline view) gives you a high level overview of your file which is very useful for quick navigation and code understanding. A file’s minimap is shown on the upper right corner of the editor. You can click or drag the shaded area to quickly jump to different sections of your file:

Folding:
Clicking on the folding/unfolding icon helps you display more or less information in the sections of your scenarios:
Tips: want to do custom fold or unfold, see the command palette feature above.
Go to definition:
You don’t know what add-ins refer to? Thanks to the go to definition feature, you can get the add-ins’ definition very easily in just one click.
Ex: “response.delay” = Delay the current template by X seconds “Entities.extract” = Extract entities from the current utterance
5 - The Status bar
In the status bar, you have a live report of all bugs/problems found in the Athena code of your file. The analysis displayed in the status bar is on the fly. Click on an error and the editor will automatically jump to it. Navigating between code issues is much faster and easier:
C - The testing chatbox
On the bottom right hand side of the Knowledge and Skills Editor, the testing chatbox can be displayed once you click on this icon  . In this dialog box, you can test your conversation scenarios in real time with the testing xBot.
The text field allows you to enter your message and the  button to send it. You can also simply talk to your testing xBot by clicking on the
  button. Please note this feature is available only via the Chrome browser:

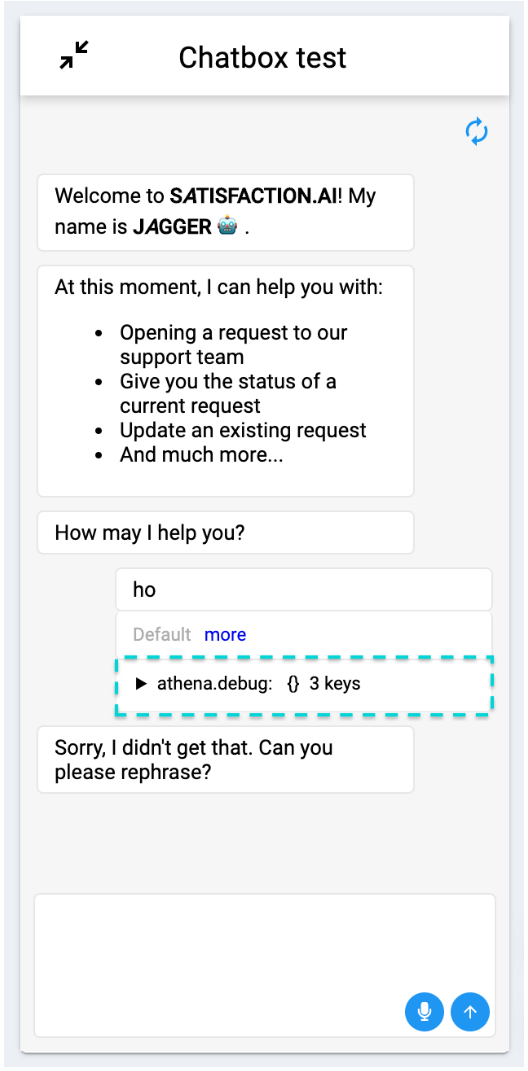
1 - The more menu
Clicking on the  button will display the top 3 intents which the sentence is the closest to and the elected intent that matches the sentence.
Because sometimes the elected intent is not what you were expecting, this list of the top 3 intents that are the closest to your sentence has been added to help you understand better the behavior of your xBot.
If you want more information on the Elected intent, please consult this page.
If you want to reset the conversation and start again, you can do so by clicking on this button  :
:
2 - The debug menu
The new Athena debug functionality appears below the message sent by the end user in the testing chatbox.
Extremely useful when you need additional information (besides the intent triggered) regarding the answer of the xBot. It is also very helpful when you have to debug any issue in an existing scenario.
When unfolding the “athena debug” option, you’ll find plenty of information. At first, it can be scary, don’t be afraid ! It is not as complicated as it looks like. Moreover, this is the first version and more is yet to come.
All those elements will guide you through the decision process of how you get the xBot answers.
- Let’s see an example:
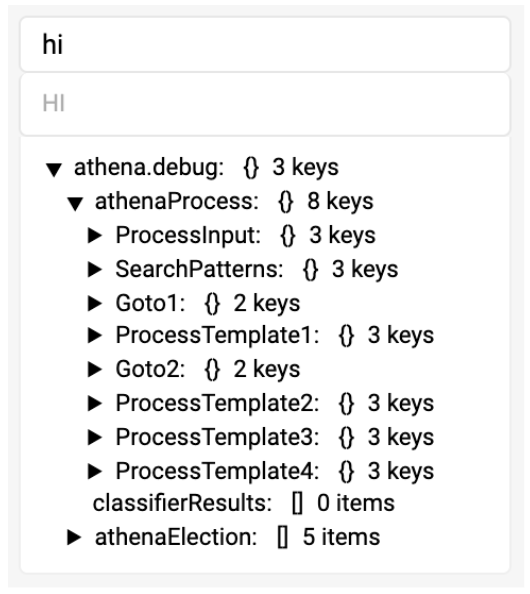
In this particular example, when unfolding the athena debug option, you will discover:
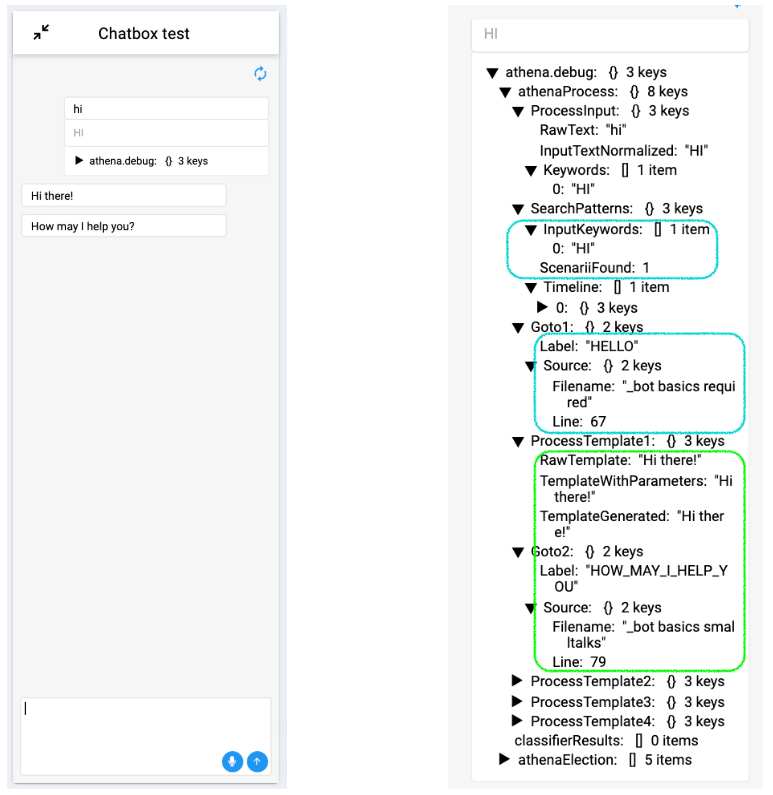
The section “athenaProcess”: in this section, the most important subsection is SearchPatterns.
In this example, we can see that the AI model has detected the word “HI”, then in the subsection below “Goto1”, you can easily find that “hi” belongs to the label “hello” located at line 67 in the athena knowledge file “_bot basics requirements” that you can find in your Knowledge & Skills page of the portal.
To go further, the subsection “ProcessTemplate1” extracts the answers that the xBot is supposed to provide to the end user in that case (bot answer + filename + line).
Another section you need to look at if interested in entities triggered is the “athenaElection” section.
D - Understanding methods of your users Intents
Let’s take the following Athena © script example:
?! hi
? HELLO
? Good morning
	- Hi, I am your conversational agent. Do you want a coffee this morning?
	? YES
	- Ok, I have just ordered one for you, it will be ready in few seconds.
	? NO
	- You are right, it is not the best for your health :)
You xBot’s understanding of your users intents can be done via 2 ways:
- NB:
The following keyboard shortcuts are available:
- CTRL + S : these keys combination will allow to save your edits in the Athena editor
- CTRL + Z : these keys combination will cancel/remove the last edits
1. Keyword matching
The keyword matching do not imply Artificial Intelligence since it is based on the simple comparison between the client inputs and keywords. Via this method, you can associate the xBot response with the possible exact words or sentences used probably used by your users. You can do this via the syntax “?” in your Athena © script, such as «HELLO» and «GOOD MORNING» in the example above.
2. Intent detection
The xBot detects the intents of the user thanks to its natural language understanding capacities related on the Artificial Intelligence algorythms of our satisfaction.AI platform. In the example above, if the “hi” intent is detected, the xBot will display the response described lower in the Athena © script, retrieved using the syntax “?! Hello”.
3. Order of the detection method
The order of the syntax “?!” Or “?” defines the priority of the understanding method used: if you want to use the Keyword matching first, you must write in the scenario the call to this method in first. In the example above, the Intent detection is prefered, hence “?! hi” appears before “? HELLO” and “? Good morning”.
NB:
In the Athena © documentation, you can find more information about the syntax of this language, as well as samples of dialogue scripts.
E - What’s next ?
Once your answers are described in the “Knowledge and Skills” page, you have to create a gateway between the user’s intents and the scenarios described in Athena © scripts. To do so, you have to declare the intents of the “Knowledge & Skills” page as seen above AND create the same intents in the “Intents” page of the portal. ___
Documented/reviewed 04/10/2019 7:12:55 AM